CAS - Quick Pick Set up
- Kristy Sherman
- Kimber Morrison (Unlicensed)
- Navik Prakash (Unlicensed)
- Eric Guzman (Unlicensed)
Overview:
This is the CAS set up for Quick Pick which gives the cashier menu driven access to 144 items at the sales transaction screen. The items are pre-defined customizable speed keys for ringing up sales based on pre-defined classifications or attributes.
This is especially useful when check out is menu based such as in an ice cream shop or fast food merchant, items which cannot be scanned easily.
Detail:
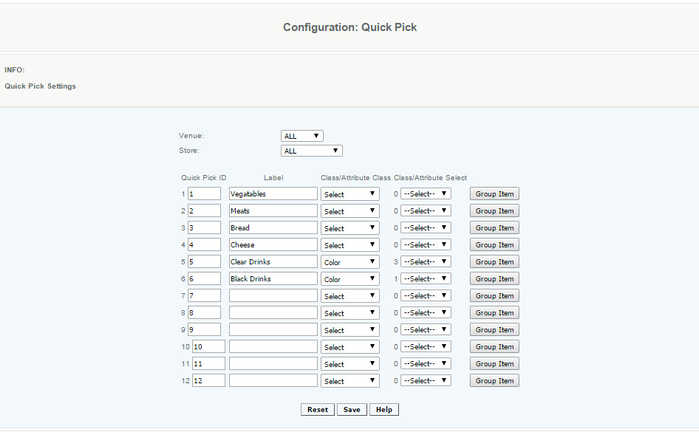
Select from 1 to 12 Labels to define the items that will be represented in the Quick Pick items. These should be grouped in like items that will help the cashier select the items that the customer is purchasing.
Enter the name for the Label to define the Quick Pick Group
Press on the Group Item button to display a screen to enter the items in the group. Save the Groups, then save the Quick Picks.
Hint:
When originally creating Quick Pick Settings, leave the Venue and Store as ALL. Your Quick Pick will send to every Register within your Domain.
Now if you have multiple Venues and/or Stores, you can filter through them and define your Quick Pick Settings for each.
Group Item:
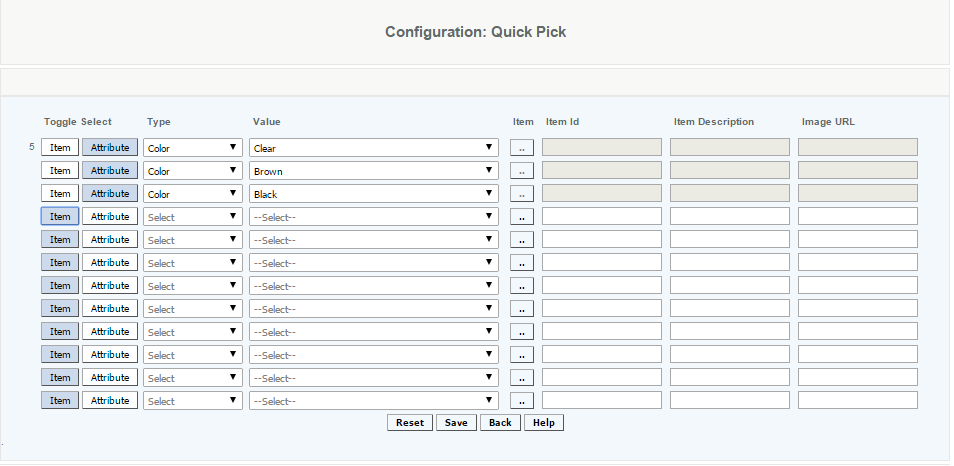
There are two ways to display Items for Quick PIck. You can display the items by Item desciription or by selecting the Attribute (such as style or department).
By Item:
When Item is selected, the items can be selected by entering the item ID's in the area or by pulling up the item search and selecting the items to include. This is used for quick access to items such as the most commonly sold items, especially those without barcode labels to scan.
By Attribute:
When Attribute is selected, the items can be selected by selecting the Attribute Type, then all items that are attached to those Attributes will be added to Quick Pick. This is used when it's easiest to display the items by a specific department or style, etc. It's helpful in retail environments where you group by style and items selected are by size/color.
Once all items are selected, save the Group.
Image URL:
The URL entered will display the picture of the item on the Quick Pick button on the POS or Tablet. The url can be entered here or entered on the Master item screen.
Reset the Quick Pick Labels and Details:
To clear data and start fresh, you can reset the quick pick settings by going to Configurations>POS Settings>Reset Settings select Quick Picks and Save. This will clear the labels as well as the item details
Access:
Access is given to System Administrator and Financial Roles.
Video:
Setting up the Quick Pick Labels:
Setting up the Quick Pick Items: