POS Settings
- Kevin Colaco
- Kristy Sherman
- Backup Settings
- Mail Server
- Speed Key Settings - CAS
- Cashier Bank Settings - CAS
- Package Handling - CAS
- Related Items Recommendation - CAS
- Other POS Settings - CAS
- Reset Settings - CAS
- Cash Drawer Settings - CAS
- Reorder Level Settings
- CAS - Quick Pick Set up
Backup Settings
Overview
Backup settings will include information required while keeping a backup of the data by the POS unit. The backup can be saved locally or on a remote system, at either a Hourly, Daily, Weekly or Monthly frequency. There will be space requirements that have to be considered depending on the frequency of the backups.
Configuration POS Settings Backup - This sets your CAS and POS backup destination
If you want to save the POS backup locally on the POS, then from the POS set the backup to the local setting - otherwise these settings will be used (you should confirm on the POS that you do not have the setting overridden at the POS level)
If you want a CAS backup other than your scheduled time, you can create a backup immediately from Utilities>Backup
Difference in Selective and Full Backups:
The selective setting will backup the primary transactions, whereas the full backup will backup additional tables which may have modifications. This link will display all of the tables backed up by each setting so you can determine which level of backup you are comfortable with. Note that the full back up will of course create a much larger file and required more resources to store.
Point to Consider
There will be space requirements that have to be considered depending on the frequency of the backups. You can also obtain backups from the Central Server, your at risk data is data that is on your local POS that has not been pushed to the server.
Details
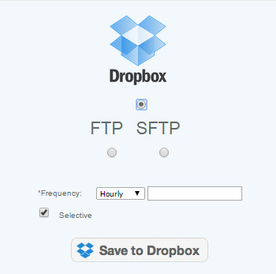
Dropbox
If the backup is on a Dropbox server site then the user chooses the frequency, press save to Dropbox. This will then take them to a page where they will have to enter there username and password for there Dropbox account. Once that is save whenever you set your backup frequency thats when the system will create backups for your information.
FTP/SFTP
If the backup is on a FTP/SFTP Site then the user must specify the IP address of the system. The user must enter the username and password, which are the same as the ones used for logging in to the CAS server, and select the frequency (how often the backup will occur). You can use your own ftp site (many are available at no cost).
Locally (POS)
If the backup is saved locally (on the POS itself) then the location to save the file is to be specified in the Path field. The path to save the file on the server is unique to each merchant.
Access
Access to this function is limited by default to the System Administrator and Financial Users only.
Mail Server
Mail Settings - Set up
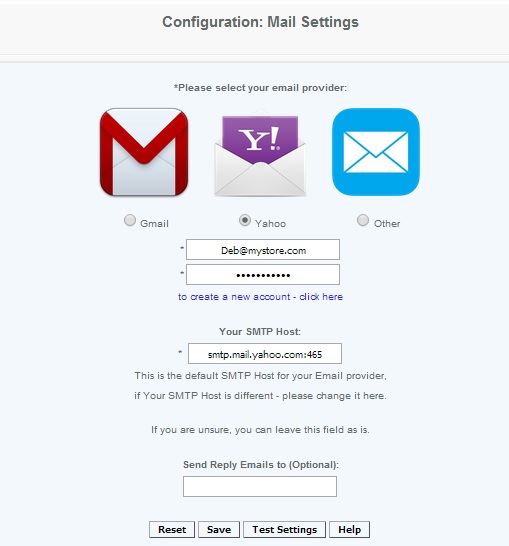
The Mail Settings section is where the mail settings are set up. This allows for emails to be generated for the various features that need to send out emails, such as for emailed sales receipts, email alerts, and password expiration alerts.
The user selects their email provider. The SMTP host id/name, which is the system that is to receive the email,is pre populated for gmail and yahoo. If a different email provider is used, enter the SMTP Host field.
Enter the username and password for the email account.
The reply email address can also be entered if different from that entered above.
Once the mail server is set up, password expiration alerts can be sent to the employees (if emails are provided for the employees), as well as to use the features CRM Builder , Go Green and Email Alerts. Without having the mail setting these features cannot be implemented.
NOTE: If POS transactions involving email receipts (such as CRM Builder, GoGreen or Dwolla) are attempted without mail settings being set up on the CAS, the cashier will get a error "POS is offline and receipt cannot be emailed".
Popular Email SMTP settings:
Gmail: http://support.google.com/mail/bin/answer.py?hl=en&answer=13287
Yahoo: http://help.yahoo.com/l/us/yahoo/smallbusiness/bizmail/pop/pop-11.html (Example - smtp.bizmail.yahoo.com:465)
AOL: http://help.aol.com/help/microsites/search.do?cmd=displayKC&docType=kc&externalId=217449
Hotmail: http://email.about.com/od/accessinghotmail/f/Windows_Live_Hotmail_SMTP_Settings.htm
An SSL connection is required
Details
The SMTP host is a mandatory field. It can be an IP address of 4 positive numbers separated by 3 decimals, ranging between 0- 255 or a DNS such as mail.yahoo.com. The mail settings will be pre-set so that when the user clicks mail under configuration, the fields should have previously been set. If not, the user can set the fields and save them for future use. Please note that some free services limit the number of emails you can send. (as an example smtp.gmail.com:465)
The Username is a mandatory field, and it is the username that is associated with the email account. (user names can not exceed 30 characters)
The Password is a mandatory field. and is the password that is associated with the email account. (passwords can not exceed 30 characters)
Reply Email: is a hidden value to the recipient unless they are replying to the email.
Test Setting button sends out a test email so the user can confirm that settings are correct and emails are being generated.
Following is an Example of where the emails will be visible to the recipient of the email:
Configured email setting with xyz@test.com as actual one and reply email address as abc@test.com.
User receives email notification from xyz@test.com and if user sends feedback and clicks on reply, reply email address is set as abc@test.com as per settings.
Access
Access to this function is limited by default to the System Administrator only.
Speed Key Settings
Overview
The 12 Function keys plus plus the 12 combination Shift + Function keys can be each be asociated to an SKU and can be entered into the transaction by pressing the Function key or appropriate Shift/Function key combination. This function allows a cashier to press a "speed key" instead of scanning the bar code of an item. (Note: Can also be set up directly on the windowsPOS terminal)
Detail
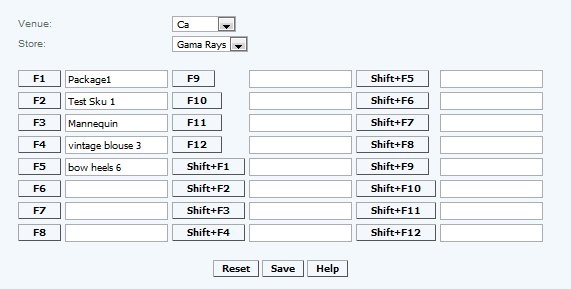
To add a speed key the user takes the following steps: After selecting the venue and store, they choose a speed key and types in the product name, or clicks the Shortcut number button next to the box and is taken to an item lookup screen where user can search for an item using its UPC, name, vendor, etc. After making changes to the speed keys the user can press save, or if user wants to clear the keys to reassign them to different items the user can press the reset button. At the POSthe cashier can use the speed key function to quickly bring up the designated items during the sales transaction screen.
Function speed keys can be set at an enterprise level or modified at a store or register level. Function speed keys can also be set at a POS level by users with appropriate rights
Reset - Clears all fields and if saved resets all speed keys.
Access
Access to this function at an enterprise level is limited by default to the System Administrator and Financial users only. Venue and Store managers may modify settings at Venues or Stores assigned to them.
Cash Drawer Opening Settings
Overview
After selecting the venue and/or store, user can check the boxes of the desired payment modes that will prompt the cash drawer to open.
Details
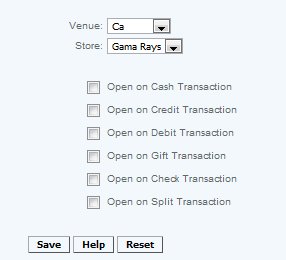
Click on the transactions that you would like the cash drawer to open. Typically the cash, check and split transactions are checked, for credit, debit and gift this would depend on whether your transaction receipts are stored in the cash drawer or not.
Limitations : When user modifies the settings at register level, they cannot go back and reset or change in CAS again for that register, it will not be pushed to the POS. Once the cash drawer setting is modified at the register level user has to continue to the modifications at register level only.
Access
Access to this function at an enterprise level is limited by default to the System Administrator and Financial users only. Accounting, store managers, warehouse general managers as well as zone managers and human resource managers may modify cash drawer settings at Venues or Store assigned to them.
Opening & Closing Banks
OverviewThe user can select different options for the opening/ closing of the bank. The method selected will impact the POS Opening/Closing Bank Operations in terms of simplicity and verification. Regardless of mode all banks will automatically close at 4:00 am. | |
|---|---|
Opening Bank OptionsThis setting is used to set based on what Opening and Closing Bank procedures will be implemented.The Simple Option would be to enter the amount of the opening bank, there would be no verification. If bank is opened multiple times in a day, without closing the bank, the open amount is overridden with the latest opening amount.The Modified Option would be where the employee would enter the amount of each denomination, and the pos would total the bank, prompt to verify and then process the bank. If the opening balance did not match the closing balance, an email alert would be generated.The Detailed Option would be where the employee would enter the quantity at the coin or currency level, and the pos would total the bank, prompt to verify and then process the bank. The denominations would be for a consolidated prompt for coin, with a popup that could show the detail (.01, .05, .10, .25. .50, 1.00, 2.00) and for currency $1, $5, $10, $20, $50, $100. | 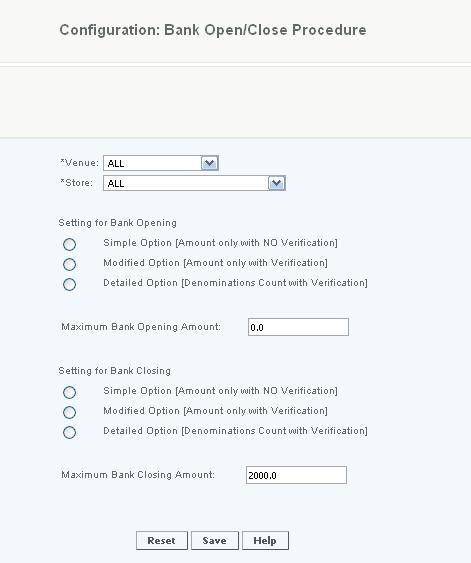 |
Setting the email alert | 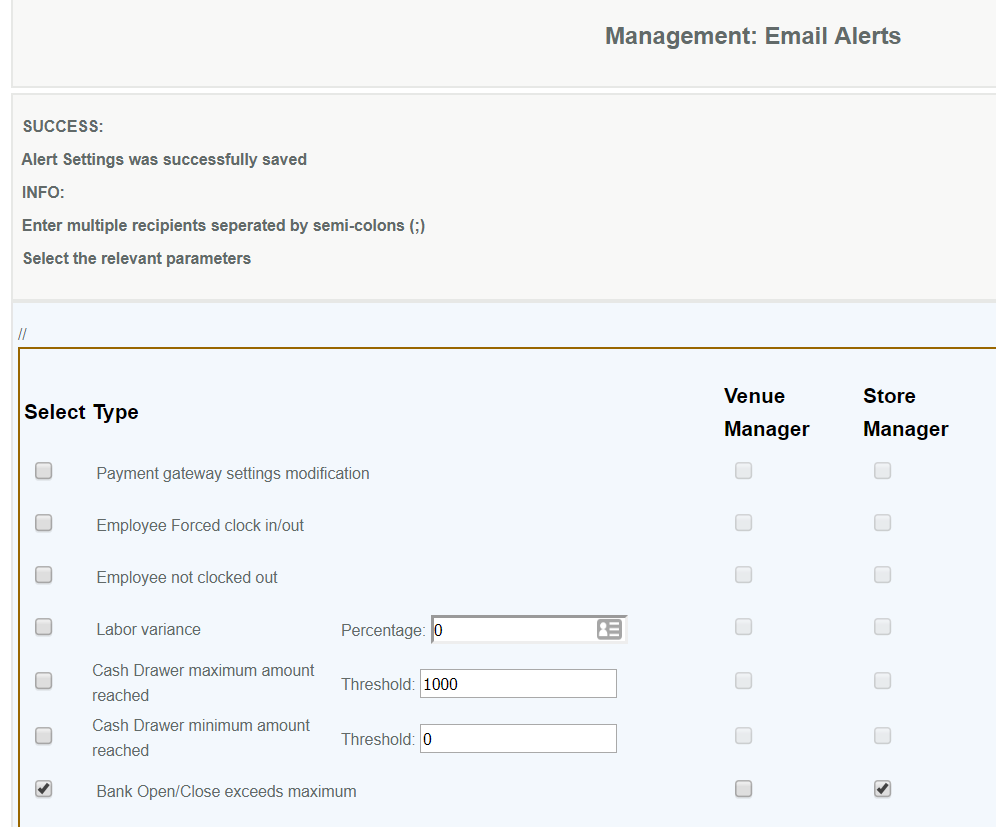 |
Additional Opening Bank DetailsThe Maximum Bank Opening Amount is not relevant at this time In all instances of reopening banks where verification is set to on, the new opening balance must equal the old closing balance. If this is not the case an email alert will be generated. The variance between the banks will be reflected in the cash pick up total. | |
Closing Bank OptionsThe Simple Option would be an automatic close of the bank at 4:00 amThe Modified Option would require the user to enter the amount of each denomination, a subtotal would be displayed at the bottom, which would be tested against the not to exceed total. The user could modify the denomination counts so that they could get to the not to exceed total.The Detailed Option would require the user to enter the quantity of each denomination, a subtotal would be displayed at the bottom, which would be tested against the not to exceed total. The user could modify the denomination counts so that they could get to the not to exceed total. | |
Additional closing bank DetailsUsers may not close a bank for above the Maximum Bank Closing Account regardless of the mode selected. If the deposit amount is greater than the maximum bank closing account specified, a popup box will be displayed and the user will have the ability to modify the closing amount. If the closing bank amount is less than the bank amount from the cash balance report, a deposit box will be displayed for the user to enter the deposit amount.Once the user had completed the close function, the total cash (closing+deposit) would be tested against the cash balance total. If there was a match the POS prints two closing receipt both showing the closing bank and deposit (including currency detail). If the totals do not match, the screen goes back to the deposit screen and the user is advised to recheck the totals and can repeat the process. If it fails a second time, it will prompt for a supervisor override and an alert is sent to the VGM if it was enabled on the alert management screen. |
Access
Access to this function at an enterprise level is limited by default to the System Administrator and Financial users only. Accounting, store managers, warehouse general managers as well as zone managers and human resource managers may modify cashier bank settings at Venues or Store assigned to them.
Package Handling
Overview
After selecting venue and store, user checks a box if packaging for items rung up at sale/refund is desired.
Detail
This is used to set the method that items should be handled at the Point of Sale if they are part of a package.
If you check the boxes and items are presented for purchase or refund at a register, they will be automatically combined to receive the package price even if that price is not requested. If the box is left unchecked the customer will have to request the package price.
If the items are consolidated at the Point of Sale into a package, a popup message is displayed to the cashier, so they can advise the customer of the package offering.
Access
Access to this function at an enterprise level is limited by default to the System Administrator and Financial users only. Accounting, store managers, warehouse general managers as well as zone managers and human resource managers may modify settings at Venues or Store assigned to them.
Recommended Items
Overview
User selects venue and/or store then selects recommendations on a product. If a client buys one product, they can be recommended different products based on ones other customers purchased, recommended items, or ones established by management. For example, if a customer purchases a fleece zip up the suggested preselected products will be recommended to the customer; items such as a short sleeve shirt, matching sweat pants, or a hat. The recommendation types are explained in further detail below.
Details
The application has the ability to recommend items at the Point of Sale based on rules that are selected at an enterprise, venue or store level.
Other Customer Purchased is the default setting, when a customer presents items at the Point of Sale it will make recommendations for additional items based on what other customers who bought the same or similar items have purchased. The rules will be set to either recommend items based on data on the Local POS only or from the total enterprise (CAS Server) or to look at the local POS first then go to the enterprise data (you would select this in the interest of speed)
In addition to Other customer Purchases, the rules can be set to three other options:
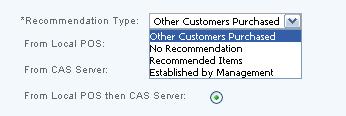
No Recommendation would be selected if you do not want the POS to recommend additional items to the customer
If the Recommended Items option is selected the application will recommend 3 items that will have been predetermined. These would typically be items that are on sale or are items that you are promoting for turnover or impulse purposes.
The Established by Management option allows for recommending items based on what item is being purchased, these are set by management and would be based upon seasonal or promotional patters, for example if a consumer buys a specific shoe, you may want a prompt message to be displayed recommending a specific belt or another product. This option requires much more management as they have to be constantly reviewed for trends and patterns.
Handy Hint
Items are only Recommended at the Point of Sale only if the item was received or sold at the store at least once. They are recommended regardless of in-store stock levels.
On the POS
After the options have been saved on the CAS for which type that would best suite your business. the recommended items will appear automatically without needing to switch to any additional screens. For set items, such as recommended items, or set by management when the criteria is met the suggested items will appear. For other customers purchased it will be based on past transactions, and similar classifications and attributes for the item being sold. So implementing this can create a custom up-sell for all users to have available to them. Especially during holiday season where the majority of retail business is done. The easiest to implement would be the other customers purchased. For new users to the POS it would be recommended to start with three base items and determine what could be sold with those until a transaction history has been established. To help determine these item users can refer to the attribute analysis report.
Recommended Items- Other Customers
Access
Access to this function at an enterprise level is limited by default to the System Administrator and Financial users only. Accounting, store managers, warehouse general managers as well as zone managers and human resource managers may modify settings at Venues or Store assigned to them.
Other POS Settings
Overview
This feature is used to prompt the cashier to add a customer to the mailing list; along with setting the refund verification and Prevent mandatory fields for customer creation.
Details
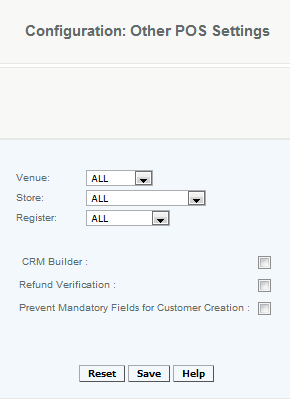
If the /wiki/spaces/CRM/overview is checked, customers will be automatically added to the data base when a credit card is used as a payment type. For the other tenders a dialog box will appear prompting the cashier to ask the customer if they want to join the Customer Database on all transactions where a Customer is not selected.
Refund Verification, allows a return to be verified against a transaction number and able for quick returns of all items in that transaction.
Prevent Mandatory Fields for Customer Creation, allows the user to take how much information they would like to record and bypass the mandatory fields (name and email)
Access
Access to this function at an enterprise level is limited to the System Administrator, Financial, Venue and Store managers at locations assigned to them.
Reset Settings
Overview
After selecting a venue, user can select different functions to reset. User checks boxes next to every function he wants to reset and the settings for those functions for all stores in that venue will be reset.Example: User can select the reset speed keys settings and all the products assigned to speed keys will be cleared, leaving the speed keys free for the assignment of new products.Resetting the bank procedures will reset any open/close bank setting which are set at the store level to what is set at the Venue "All" level. By resetting the bank procedures it allows for users to modify the Max for the bank open and close. As well as changing the mode back to default of simple. So as business needs change user can reset the function to start over and change. This makes it so all entities have uniform settings.
Details
It is not uncommon for several changes to be made at the POS or at a Store or Venue level. When that occurs changes made at the Enterprise level will not override those changes, the only way to have that happen is for the setting to be reset here and then modified in the appropriate user interface.
Access
Access to this function at an enterprise level is limited by default to the System Administrator and Financial users only. Accounting, store managers, warehouse general managers as well as zone managers and human resource managers may modify and reset settings at Venues or Store assigned to them.