Transactions POS
Overview:
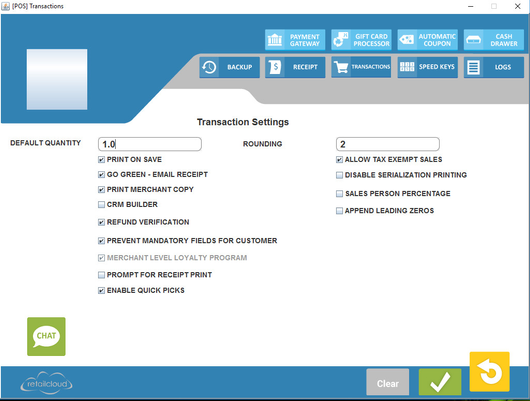
This screen is used to set the transaction information that will apply to sales transactions. Input the settings required for transactions and press save to apply the changes to sales.
Details of each field entered:
Default Quantity:
Default item sale quantity. Allows the user to choose the quantity of each item being rung up. By default it is set to 1. (Example, if set to 2 - every time an item is entered on the sales transaction screen the quantity would be entered as 2).
Print on save:
Will specify whether a receipt is to be printed at the end of each transactions, by default this is checked. If not checked a receipt will not print and the cash drawer will not open.
Go Green (Emailed Receipts)
With this feature checked it will allow the system to use the mail settings found on the CAS to email receipts to customers added to the POS. Go Green will not work without the mail server being set up
Print Merchant Copy
With this feature allows you to select if you want the Merchant Copy and Customer Copy when running credit cards. Checking the box will print both copies. If let unchecked, it will only print the customer copy, not the merchant copy.
CRM Builder:
Helps build your customer tracking data and allows for the incentives to reach the customers you want to be targeted. When a payment type is selected a POP window will pop up for customer information to be added. With credit cards, the CRM builder will pop up once the card is swiped. It will automatically populate the first name and last name on the card and the merchant will just have to add the mobile number and email. So every time the card is swiped the customer would automatically be attached to the sale.
Refund Verification:
With this feature selected it will only allow a refund to be processed if a transaction number is entered, which will match to the items sold
Prevent Mandatory Fields for Customer Creation:
The system default needs customer name and email for the Add Customer function to add a customer to the database, with this option selected it will allow users to save customer data without mandatory fields.
Merchant Level Loyalty Program:
With this feature selected it will allow you to add customers to your loyalty program.
Rounding:
To round sales amount to the nearest cent. By default it is set to 2 (as in $xx.xx)
Allow Tax Exempt sales:
Will specify whether tax-exempt sales are allowed for the sales transactions
Disable Serialization Printing:
With this feature selected it will allow you to print serial numbers on receipt
Sales Person Percentage:
With this feature selected, each sale will prompt the cashier for the sales person to attach to the sales transaction.
Append Leading Zeros:
With this feature selected, the POS will strip the lead zeros from the read bar coded value. This is helpful when item ID's and UPC's have been entered into the database without lead zeros - with this enabled only the numeric entries are read.
An Example: the UPC is 0088899994678 on the product barcode label and the merchant saved the UPC in the system as 88899994678. Instead of the system saying "Item not found" it will search for just 88899994678 and bring up the item to complete the sale.
Prompt for Receipt Print:
This feature allows you to ask the customer if they want a printed copy of the sales receipt. Enter the answer "yes" or "no," when prompted. Remember, you always have the option of re-printing a receipt, should a customer change their mind, by going to the search button on the transaction screen and selecting the transaction to reprint.
Enable Quick Picks:
This feature allows you the ability to disable Quick Picks so they will not display on transaction screen even if they are created on CAS. If you would like them to display on transaction screen you need an Enable Quick Picks (to display the labels/items).
Access Rights:
By default it is Store Managers at locations assigned to them and rights above.
