Item Import
- Eric Guzman (Unlicensed)
- Kristy Sherman
Overview
To import master items into the database. You can add minimal item detail or include very detailed information. Your chose would depend on how you want to access the items in your device, the information available on reports and report fiters. The item import must include three basic mandatory fields. (ItemID, Name, Selling Price) for a successful import. Details on all optional fields (click link)
User should be aware that how data is entered into the spreadsheet and imported will be how it directly correlates to the CAS and POS. So if a UPC has a space before the numbers it will upload with that space and will not be readable from a barcode.
User who aren't comfortable with creating an import should look at entering items through the Creating an Item
Attributes and Vendors
After you have selected you tax ID you can enter your department, categories, sub-categories, style, vendor, etc. For the existing departments, cat, sub-cat, and other attributes, you must enter the name that you have saved in your data base. If any change or misspelled you will have added a new departments, cat, sub-cat, and other attributes. This can help if a new attribute/department is introduced to the merchant
Details
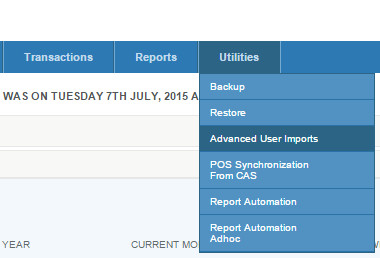
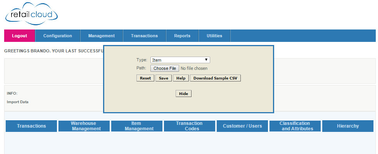
You get to the Advanced User Imports by logging into CAS - Utilities - Advanced User Imports. From there you select Item Management and select Item from the drop down.
Then you download the Sample CSV file and just enter the mandatory fields. You can enter anything else you want but everything else left blank will be made DEFAULT.
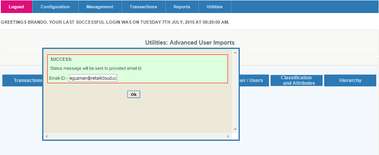
Once that is done you save it and upload the csv and if you don't have any special characters and entered the mandatory fields it will give you a success message.
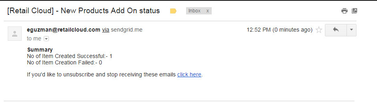
On Successful import of the master item are saved in the item table in the database, and the QOH updates to the corresponding Store/Warehouse
Enter an email address so a copy of what you imported is sent to that person.