Creating an Item
- Former user (Deleted)
- Cameron Bolourchi
- support

Quick Links
Item report Mass Modifying Items
Creating Package Items (video) Service Items
Importing an Item File Master SKU
Simple Set up of new items:
This is where you can create new inventory items. You can input as much detail as you are comfortable with using. You can always come back and make modifications in the future once you determine your needs (you have a mass modification option).
To add new items:
Enter ItemID - this can be scanned in from the item. If you do not have an existing UPC you can create your own by entering the numbers you want to use (you can create barcode labels using these UPC's that you create on the system). Do not use spaces or special characters (Max # of characters is 15). This needs to be an unique number for this item
Enter Name - this is the name of the item. Keep it as short as you are comfortable. (Max # of characters is 50)
Overview
This screen is where items are setup and all the relationships between items, classifications, attributes set. All price and item management is performed through this screen. This is also where items can be modified. When creating an item ID and UPC do not use special characters this can create issues with the system. I.E putting a space in the UPC will prevent barcodes from printing or creating an item with a dash after "AG" such as AG-100, will cause size brick creation to fail.
Fields noted by an asterisk are mandatory. If Department, category, subcategory, or vendor is left blank - default will be used.
Details
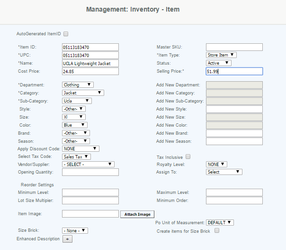
Select the Item Type from the drop down menu
Each item must have its own Name. This will show up in all reports where the Item/UPC name is displayed as well as on all POS receipts. This is also a field that cashiers can search for at the POS. Item Name is a mandatory field.
The Status field should be selected from the drop down menu (active or inactive ).
Warning
If the Status is changed to Inactive, the Item will be removed from the POS, and will not appear in any Inventory reports. This will an out of balance situation on the reports by any inventory on hand for inactive items. Once an item status is changed to inactive it cannot be undone. Changing it to active will make the items reappear on reports.
Note if you are searching for an inactive item, be sure to set the status to inactive in the search screen.
Select the Classifications (Department, Category, Subcategory) from the drop down menu. These are all mandatory fields and if the selection is not available in the drop down, a new option can be created by selecting "Other" and entering the Name in the box next to the appropriate classification (this is for new item creation, for existing items please create new classifications).
Select the Attribute (Style, Color, Size, Brand, Season) from the drop down menu. These can also be added on this screen, by selecting "Other" from the drop down option, and entering the name in the box next to the attribute (this is for new item creation, for existing items please create new attributes).
Brand - Select the brand from the drop down menu. These can also be added on this screen, by selecting "Other" from the drop down option, and entering the name in the box next to the brand (this is for new item creation, for existing items please create new brands). This is an attribute that can that can be selected and created by the merchant to define brands for the store.
Season - Select the season from the drop down menu. These can also be added on this screen, by selecting "Other" from the drop down option, and entering the name in the box next to the season (this is for new item creation, for existing items please create new seasons). This is an attribute that can that can be selected and created by the merchant to define seasons for the store.
Select a Discount Structure from the drop down menu. This will add the discount to all POS sales transactions of this item between the start date and end date. If the venue/store has a pricebook, that discount will supercede the one created on the item. When a Discount code is expired the discount code is not displayed in the drop down selection. Only current discounts appear.
Select a Tax Structure from the drop down menu, This will be the tax that will be applied to all sales on the item. If a tax code is not selected (left at Null), no tax code will be applied on the transactions.
If the Selling Price that is displayed includes tax, then select the Tax Inclusive flag. Sales on the item will be displayed at the POS less the appropriate tax. This is usually used when the objective is to keep the price including tax at a round number, typically to eliminate the need for change. Note that if the sale on a tax inclusive item is tax exempt the item price will be the same as the tax inclusive price to the customer (Example $40 item that's tax inclusive at 10% tax, Price is $36.36 plus $3.64 tax, $40. $40 item that is tax inclusive and tax exempt. Price is $40 (no tax)).
Enter the Cost Price for the item, the cost price is automatically adjusted when merchandise are received and a new price is indicated. It uses a weighted approach to adjust the cost price.
Enter the Selling Price of the item. You can also create an item with a variable price item, where the cashier is prompted for the sales price at the sales transaction screen.
Select the Vendor from the drop down menu. If the vendor does not exist a vendor record can be created or field can be left blank and the vendor will be assigned to "Unassigned" vendor
Serialization - Select from No Serialization, Always Serialization, or Sometimes Serialization. This is used for merchandise where you want to record the serial number of the item.
Opening Quantity: The Quantity of this item that is currently on hand. If you don't assign to location the value entered into this field will be entered into the warehouse ID 1.
Assign To: When entering Opening Quantity you can chose from drop down where you want to add quantity Store or Warehouse.
Royalty Level - This field not in use at this time
Reorder Settings:

Minimum and Maximum Levels: This is used when reorder levels are set for the individual items (see Configuration>POS Settings>Reorder Levels). When the minimum level is reached, the maximum level is ordered (taking into consideration lot size multipliers)
Lot Size Multiplier" This is the quantity that the item must be purchased in from the vendor (as in an order from your vendor for lipstick - it must be ordered in lots of 6, you purchase 6, 12, 18, 24... from the vendor)
Item Image: This allows you add a image to your item
PO Unit of Measurement: From the drop down selection, select the quantity that the item is received in from the vendor (as example being pencils - purchased from the vendor in quantity 24, but sold at the store as individual pencils). You would select the Unit of Measurement set up representing that purchasing 1 Unit from the vendor will be broken down to 24 items at the store item level. (See Unit of Measurement ). Note: the cost of the individual item is based on the quantity (if 1 unit represents 24 items, then the cost when you sell one of the items is 1/24th of the cost indicated here), but the Selling Price is entered at the per item amount (not quantity 24). In summary using 24 as an example: Cost is for all 24 items and selling price is for 1 as sold in the store. When the item is sold the cost will be 1/24th of the cost entered here.
Size Brick: A size brick can be created when an item is first created or when it is modified.
The Master SKU associates this item with another. All sales or entries made to this item are consolidated into the Master SKU item. Enter the SKU number of the Master SKU here.
Item Lookup When using the search feature from the master item screen, users can select the item then Item Look Up, to navigate the selected item to the Warehouse Item Look Up screen
Enhanced Description: This field is for entering in additional information to an item to be used in the ShopLocal search and also can be printed on bar code labels to enhance the description.
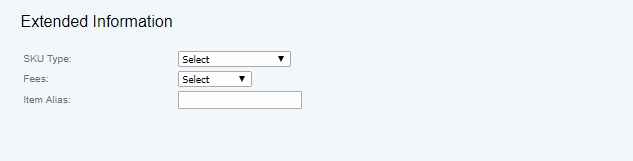
Extended Information: This field is for setting the SKU types, attaching fees to the item (like CRV), and setting an Item Alias.
Access
Access to this function at an enterprise level is limited by default to the System Administrator and Financial users only. Accounting, store managers, and warehouse general managers may modify settings at Venues or Store assigned to them.