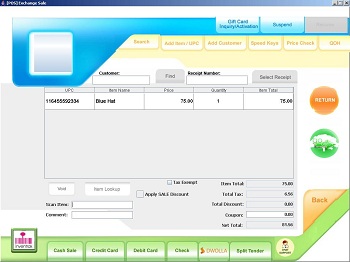
Overview: On the Transaction Sales UI, the cashier processes the merchandise sale using one of the payment methods supported by the merchant (these include cash, credit cards, gift cards, and checks). From this UI returns are also processed, as well as discounts and coupons presented by the customer.
Items can be added during the sales process, if rights are granted to the user.
On the Sales Screen, there is a drop down to display transaction level coupon codes which are available to be used on the transaction (expired coupons are excluded from the drop down list). The coupon amount will be deducted from the total sale, it applies on a transaction level. The coupon amount will be reported in Media Tender reports on the POS and included in the Real Time Sales Report on CAS. Note - the full amount of the sale will be taxed, if applicable (the coupon amount will not be deducted prior to calculating sales tax, as it done on the item level coupons).
Cash Sale
Credit Sale
Debit Sale
Check Sale
Gift Card
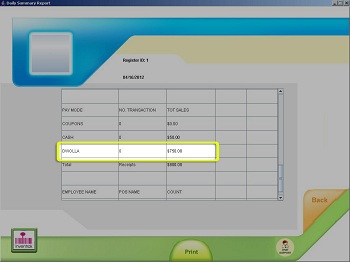
Dwolla
Overview:
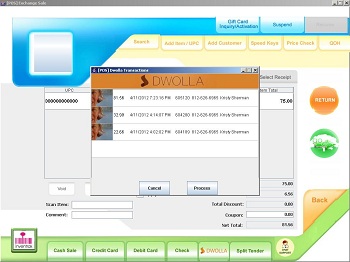
Dwolla is a payment network that works with your financial institution to offer a cheaper, safer, and overall better payment experience. Merchants can create a Dwolla account that will let the Dwolla user pay via a transfer of funds, using their mobile device. This is a secure and cost effective way to accept payment. Dwolla users can use smart phones and web browsers to pay for transactions at the register as simple as a cash transaction.

Details:
Prior to being able to access Dwolla, the merchant must establish a Dwolla account (this is set up on the CAS). Verify on the POS that settings are configured to accept Dwolla. Merchants will be able to enter in the customers Dwolla information to complete transactions at the POS. Customers will need to provide the email address that the Dwolla account is under and can be added to the customer database. Receipts can be emailed to users from the POS when mail server settings are set.
Dwolla Merchant settings can be added to the CAS
Refunds: To process a refund using a Dwolla account, select Dwolla as the tender type. Dwolla pop up will ask for "Dwolla ID" This is customers Dwolla ID who will be receiving the refund. The ID must be entered with dashes (Example 812-555-1234). Pin is Merchant's 4 digit pin #.
Access:
Dwolla is a tender found on the POS and can be used by any roles with rights to complete a transaction. Settings by default set to System Admin, Financial users and Venue/Store Managers at locations assigned to them.
Split Tender
Returns
Find Customer
Select Receipt
User presses on the Select Receipt tab, the list of past transactions is displayed, in most recent first order. The user can click on the transaction which will have a returned item. Cashier processes the return as needed.
Note: The list of transactions will only display if the "Return" Button is pressed first.
merchant transaction .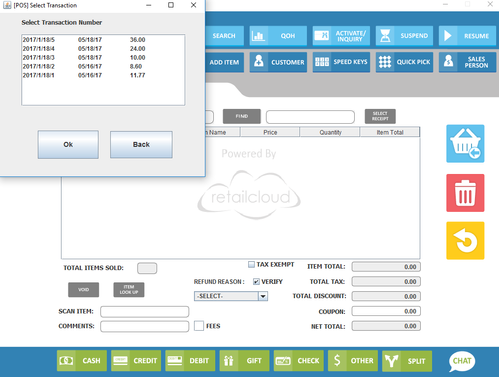
Sales Receipt
Overview
Receipt are an important part of a transaction, even though they end up buried in the bottom of a purse or left at the counter. They do provided pivotal information for users and customer, besides the what and when of a transaction.
Details
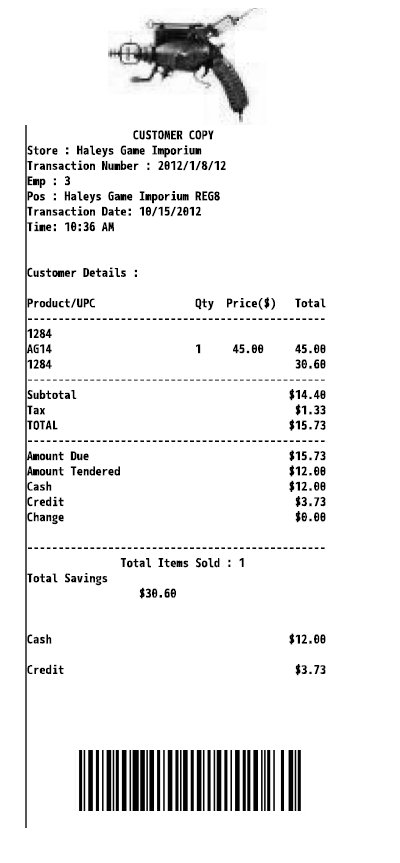
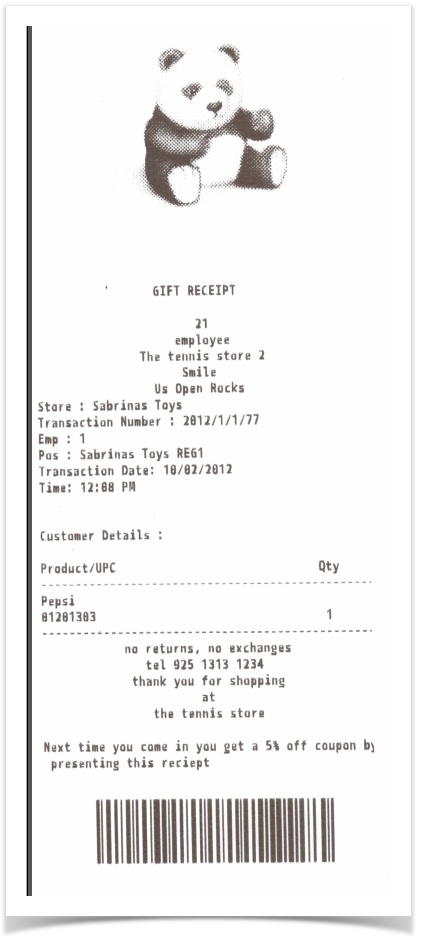
Logo
Logo that are added to the transaction can create brand recognition for your store. Has to be between 100x100 pixels.
Store Information
Will always show the store name, and the transaction number. To read a transaction number it is broken down in to 4 parts: the year, type of transaction( 1-sale,2-return,3-exchange), register number, and transaction number.
For employee tracking they are recorded for the sales, with their id
Supplied the POS names, so user can see where the transaction was done.
And the when on the transaction with the date and time.
Customer
Will show the names of the customer, that has been assigned to the transaction
Transaction Details
Pretty straight forward, it will show the items sold, QTY, selling price and if any discount or coupons had been applied.
Tender
Shows how the customer paid and how. So in this transaction it was a split tender using cash and credit.
Total Savings
Since there was a discount applied for this item, it's displaying what the customer saved today.
Transaction Barcode
One of the greatest things for the receipt is the transaction barcode, which allows users to scan in the barcode for easy returns. If a merchant has been using verified returns, with the transaction barcode, it can save time in verifying items and finishing a transaction. If they haven't it maybe time to reevaluate their return policy or try implementing.
Add Item
Add Customer

Overview:
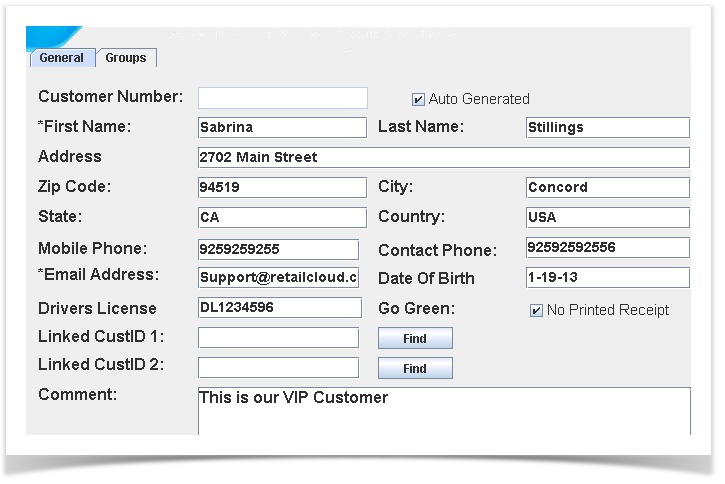
New customers can be added from the POS. If the prevent mandatory fields for customer creation box is checked on the CAS (configuration>add to mailing list prompt) the only mandatory fields are first name and customer number. Otherwise email address is also a mandatory field. Sales receipts will be emailed to the customer if an email address is provided, mail server is set up, and if the Go Green feature is activated.
Customer information can be entered in quickly by swiping Drivers License or scanning ID. If you link the customer to an existing customer who is part of a customer static group - this new customer will be automatically added to the Customer Group.
If an existing customer is selected a view transactions button pops up.
Note: POS databases only contain customer records for customers created at the store and those who have done transactions at the POS. When a transaction is performed for a customer who is not in the POS database, the application will pull the information from the CAS and update the local database similar to the way items are handled. In the event that there is no ongoing internet connectivity and the pos needs to have all customer records, a sync can be performed. This feature has added to only have required customer data at the POS and to keep the size of the data file to a minimum.
Details:
The customers can be added by the user, which can be selected during sales. The customer name will print on the transaction receipt. User can assign the customer to static groups or to a frequency group which have previously been created.
Date of Birth is a text field, so data can be entered as user wants (01/15/2013 or 01/15/13 or 01-15-13)
Access Rights:
Speed Keys
Overview:
The user can add items to the normal sale using the speed key window.
Details:
The user is allowed to configure 24 keys in the speed key settings page in configuration menu. When the user clicks on a speed key he will be taken back to the transaction sale screen with that item up on the screen and ready to be purchased.
Access Rights:
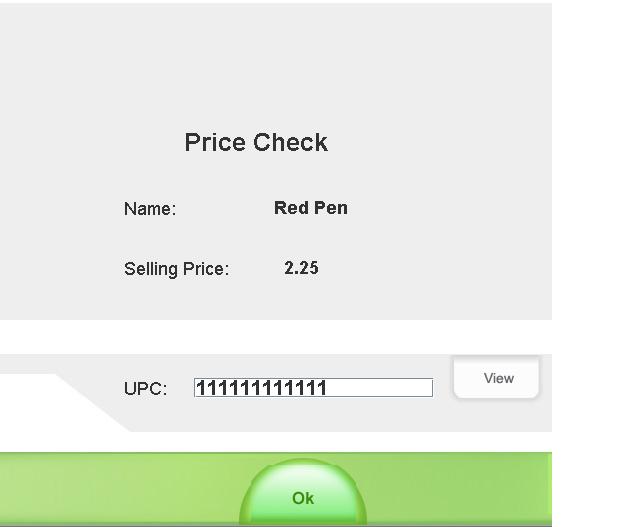
Price Check
The price of any item can be checked using the price check window.This function can be done in the middle of a sale so the user does not have to add the item to the sale. The user scans the item in the UPC field and price of the item will be displayed. If entering the UPC by entering in the UPC code by hand (not scanning), all 12 digits need to be entered.
QOH
Overview:
This is used to check the quantity on hand of any item as it relates to the store the register has been assigned too as well as any store within the venue. The search can also give a venue wide overview as well.
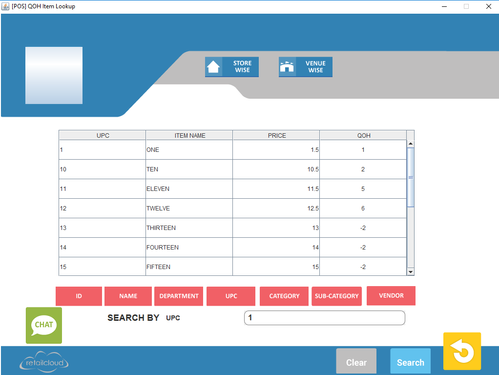
Details:
All items can be searched by any category as well as simply scanning the item. The first screen shows the QOH for the store the register is assigned to. By highlighting the item and pressing store wise, it will search all stores within the venue.
STORE WISE
Overview:
This displays inventory of the item in stores that are located in the venue. You can also do a search venue wide by highlighting the item and pressing the venue button.
VENUE WISE
Overview:
User highlights the item and pressing store wise, and the POS will search and display the quantity of the item across multiple venues.
Access Rights:
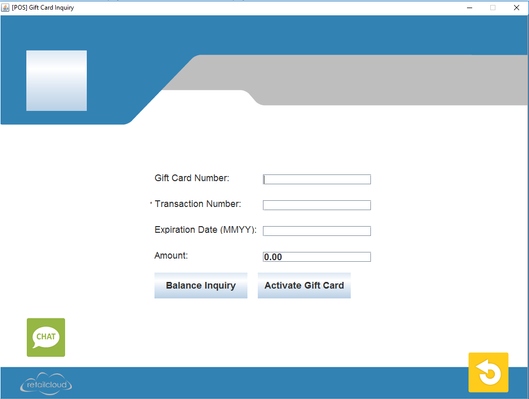
GC Inquiry
Overview:
Allows for the inquiry of a balance on a gift card or the activation of a gift card. The transaction number is required.
Suspend & Resume
Go Green

Fodder for Thought - Go Green
Save a tree - Go Green.
Go Green option is available automatically when the CRM Builder is enabled
Even with GoGreen, customer receipts can be printed, if needed using the Reprint Function
Customer information can be added on the POS by swiping the customer's drivers license
Go Green - Activation
By using an emailed receipt, we offer a way to reduce the paper trail by giving customers the option of having their transaction receipts automatically emailed to them. If the customer opts to "go green", the cashier validates an email address on the payment terminal and the receipt is instantly transmitted to the customer. This feature provides store owners with a beneficial way to gather customer data into the system, therefore providing a better way to gain access to customized customer information to better market towards them individually. By activating the CRM builder it will allow user to be prompted for "go green".
Mail Settings must be enabled in order for the emailed sales transaction receipts to be sent to the customer. These are set up on CAS under Configuration>POS Settings>Mail.
For a customer to be emailed their sales receipt, either the CRM Builder needs to be enabled (on CAS under Configuration>POS Settings>Other POS Settings) or the customer needs to be added (on CAS or POS) and GoGreen added on the customer record.
Sample Email Receipt
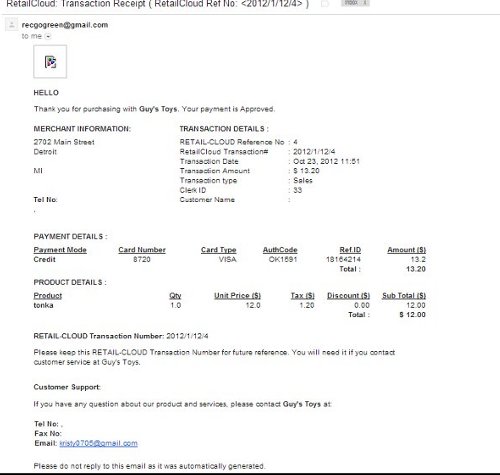
Receipt is automatically emailed to the customer record on file. If the customer opts to "go green", the cashier validates an email address on the payment terminal by adding customer to the database by CRM builder and the receipt is instantly transmitted to the customer's email address on file .
Access
CAS Access is for System Admin, Zone Manager, Venue Manager, and Store Manager. All levels have access on POS to setup customers and go green option.
Gift Receipts

Often a customer is making a purchase as a gift and wants the recipient to be able to return the item if it does not suit them. The POS can create a gift receipt at the time of the sale in two different ways.
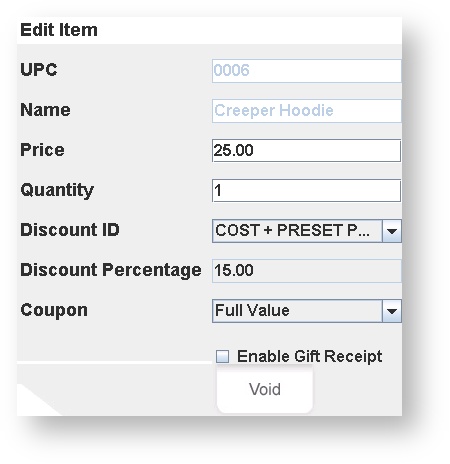
- Gift Receipts can be printed from the Edit item screen. (Note: If the customer purchases more than one of the the same item, the gift receipt will show the multiple quantity). Please note that the Gift receipt will be attached to the customer copy (not cut to separate). This is used if the cashier knows of the need for a gift receipt before the sale is complete.
- Gift Receipts can be printed from the "Search" field on the sales screen (once the transaction is completed). The receipt is selected and "Print Gift Receipt" pressed. This is used once sale has been completed.
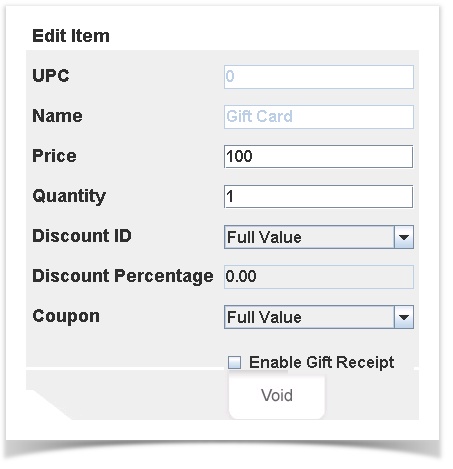
This is where the cashier would enable the gift receipt during the sales transaction - through the Edit Item screen.
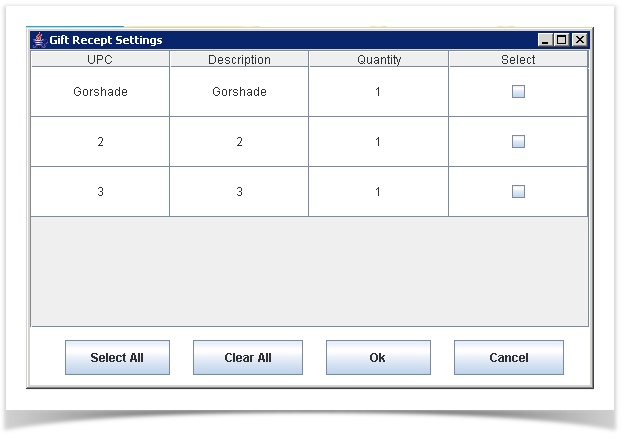
You can select an individual item to be printed on the receipt.
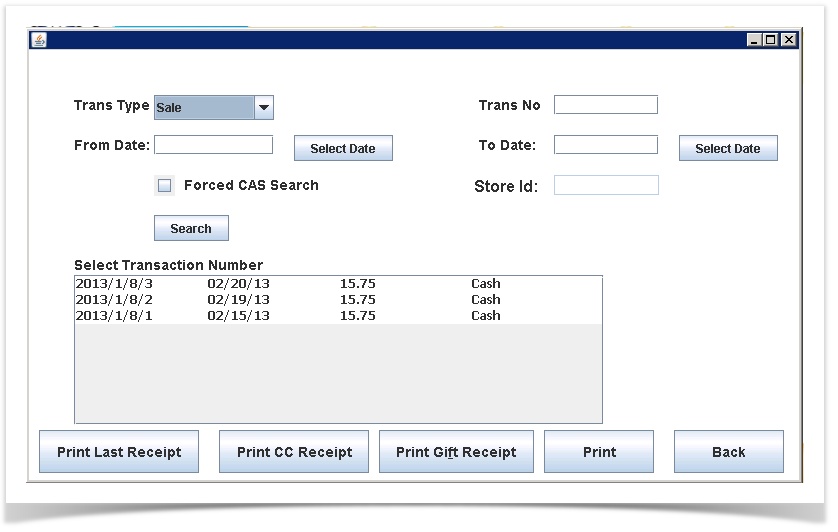
Reprint the Gift Receipt from the Search option
Discounts
Quick Links:
Overview-
Discounts are often used in retail to discount overstocked or end of season merchandise, and can be used to appreciate your customer base, especially if it is designed around your CRM builder and customer categories. For employees it allows a perk, encourages sales and understanding the products you, as the merchant, provide. When employees use the items sold for personal use they can better describe and recommend the items. It is also a good way to clear back stock or seasonal items that maybe taking up space on the sales floor, that other relevant items that could generate revenue could be stocked. A great way to determine these items is from the attribute analysis report.
Discounts can be applied at the POS in one of two ways; at a transaction level where the discount is applied across all items in the transaction, or at an item level, where it is applied on a single item. In addition items can be modified to always ring up at a discount by applying a discount code at the master item level or at a price list level.
Note: Discounts that have expired or have not started according to their start/end date will not appear in the drop downs.
Discount Hierarchy: See Pricebook discount hierarchy. Discounts at the transaction level take priority over (override) discounts given at the item level, regardless of % mark down.
Edit Item Screen
Cashiers can add a discount directly to an item by clicking on an item in the transactions screen. They will then be directed to the edit item screen where a discount can be selected from the drop down. Price of the item and the tax for the item will then be recalculated
Transaction Level Discount
Cashiers can add a discount to an entire transaction by selecting the "Apply SALE Discount" box. The discount can then be scanned in with a bar code scanner or selected from the drop down. Tax and price for the entire transaction will then be recalculated.
![]()
Multiple Item Discounts:
Multiple Item discounts are setup on the CAS level and automatically apply to items on the POS. These discounts are enabled on CAS level to apply a certain price or discount amount to a certain amount of items that are rung up. I.e. Buy one get one half off or buy 3 get one free. These discounts are applied to certain attributes or classifications that are selected on the CAS level.