Setting up (Modify) ShopLocal
Overview:
ShopLocal allows for the retailer to make their merchandise available to on line searches (such as Red Laser, Paypal Local, and Milo). Product information includes price and availability. This feature is a key to building a strong connection with shoppers. ShopLocal is set up under the Configuration>Marketing module. Select the user name from the drop down selection (there can only be one user and they must have the role of system administrator or Financial). The ShopLocal user sets up ShopLocal and receives relevant emails. Upon selection of user, to proceed with the set up, press Save & Next button.
Details:
Step one: User is selected from the drop down selection (this should display users with system admin and financial roles), press "save and next" button.
Step Two: User is prompted to enter email address, then "Save and next" button to continue.
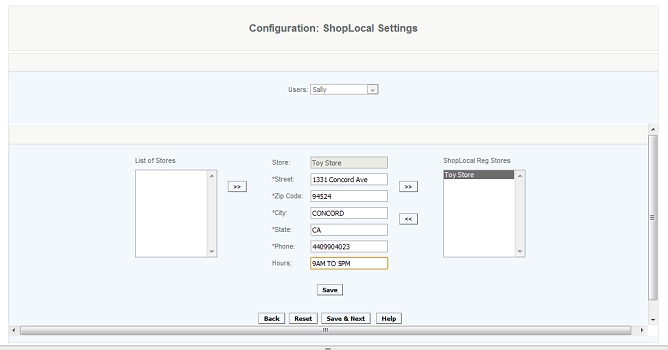
Step Three: SETTING UP THE STORES - User selects stores to be included in ShopLocal, completed the store address, presses "Save", then move the selected stores over to the ShopLocal store area using the arrows, press "Save and Next" button to continue.
This is also used to add or delete stores from ShopLocal using the same process. To add a store, select it from the list on the left, complete the address, press "Save", move it over using the arrow, then press Save and next. To delete a store from ShopLocal, use the arrow to deselect the store, so that it moves to the list on the left, and save.
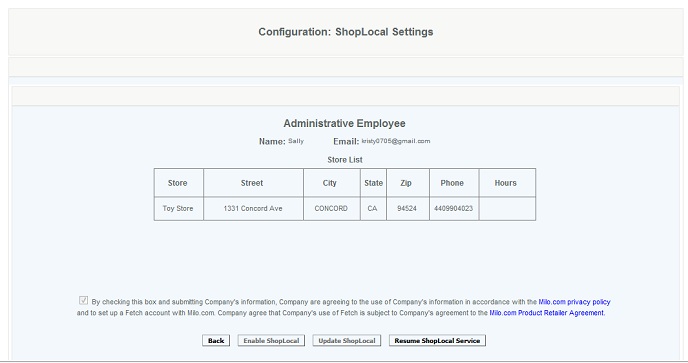
Step Four: ENABLE SHOPLOCAL: At this phase the user can accept the terms, and select "Enable ShopLocal" (this is also where the use can cancel using ShopLocal, or reactivate it if they had previously canceled it). Review the agreements as necessary and check the box acknowledging agreement to the terms. Press the "Enable ShopLocal". This activates the stores with Milo. Allow 24 - 48 hours to update info with Milo.
Modifications can be made (update ShopLocal stores, add or remove). Store hours are not editable, the hours are set at initial set up and cannot be modified. To discontinue using the ShopLocal feature, press the "Stop ShopLocal Service" button. This will stop the service on all stores. If the user later wants to reactivate, press the resume button.
Enter password, Confirm password.
Note: every 24 hours data is updated with Milo.
Access:
Users with access are System Administrator or Financial roles (only one user is permitted)


